Saturday 31 August 2013

In with the new - mulch that is.

My friend Michael has mountains of wood chips/saw dust as a by-product of his wood biz. Each year I get as many bags of these wood chips as will fit in my car, to spread on the paths of my small enclosed vege garden.
The old chips that have been on the paths since the previous year have started to break down and, mixed with the weeds and soil dropped on the paths, have started to produce a sort of rough compost.
 
Scraping this mix, helps clean the pathway of fresh weeds, and I find I have a great mulch to spread on the garden beds around the existing plants.
For a few weeks, all looks weed free and well cared for. The "path compost" can continue to break down on the beds, adding a little bit more humus and some more nutrients to the soil.
At one end of the vege garden I have a couple of old crates that I use as compost makers. But not too much of this compost ends up on the garden beds.

 
The reason for this is that because the garden is quite small, and we've only been using it as our primary vege garden space for the last few years, I am still in the process of expanding it.
How I do this in a way that requires almost no work on my part, is to move the compost bins each spring and use the resulting compost pile from the previous year as part of the new garden space. This way I increase the vege garden beds by about 3 square metres each year, and the new bed is weed free and well composted for a new season.
I do dream about having more compost to spread around the rest of the garden. But I make do with planting green manures, using the "path compost" and buying worm poo each spring.

Thursday 29 August 2013

Green manure my way.

At this time of the year I start to think about filling in the increasing amounts of bare spots in the garden with a green manure. This not only protects the bare soil, but is a good way of helping the fertility.
Given where I live in Canada, I have trouble finding green manures to sow in my garden. I could be organised and order some from a seed company, but I usually don't think of it til I want to sow the green manure.
My solution is to go to the local grocery store, and buy a bag of dry peas-the ones sold for making soups.

 
I fill about a 1/3rd of a jar with the dry peas, and soak over night. I then plant the soaked pea seeds in any bare areas that have opened up in the garden. I dig shallow trenches about 1" deep and plant the seeds about 1"-2" apart, then cover the seeds with soil. I make these trenches about 2" apart until a particular bare spot has a dense planting of seeds.
If I do this after a heavy rainfall, I don't have to bother with additional watering. In about a week or 10 days the pea shoots will start to appear. I'll repeat this process with any new bare spots over the next month.
By the time the first killer cold weather occurs, the peas have made quite a bit of growth. They then break down over the winter,so by next spring they have become part of the soil, adding humus and nitrogen to the soil in the process.

Tuesday 27 August 2013

Saving Seeds

It is the time of the year that I think about saving seeds of my favourite flowers and vegetables.
Saving seeds from flowers like Calendula, Holly hocks, Columbine, Black eye Susan, Poppies, Sunflowers etc, is as easy as letting the flower heads go to seed on the plant and collecting the seeds when they have matured and dried off, which is about 5-6 weeks after the flower was in bloom.
At this time of the year, every few days I go into the garden armed with paper bags or small plastic containers, and either snip the dried brown seed head off the plant into the bag, or in the case of poppies and columbines, just shake the seed head into the bag. Don't forget to label the container.
I take these seed heads and dry them for a few more days in a warm spot inside, in an open container or on a paper towel and then separate the seeds from the seed pod. I don't get too fussy with getting rid of all the remnants of the seed pod. Put them in a small bag (I use a small paper envelope), and label them with the variety, colour and year collected. Store them in a cool dark, dry place.
Over the next few weeks I'll get enough seed for the next season or so.
Vegetable seeds take a little more work, but not much.
For veges like arugula, lettuce, cilantro and parsley, I treat them as above. That is I let the plants go to flower, then wait til after the flower heads have dried off on the plant then harvest the seed.


Peas and Beans are much the same. Wait until the beans and pea pods are nice and fat and have started to dry off on the vine. Then they can be harvested, and brought inside to continue drying for a few more days in the pod. After the pod is very dry, they can be shelled and put into their labelled containers and stored. I usually end up with many jars of dried peas and beans. They are good for cooking with. The trick is to not eat them all and save enough for the next seasons planting.
Chilies if they are thin skinned can be dried intact. In Canada I grow my chilies in pots, so I can bring them inside when it gets too cold for them outside. This means that when I leave Canada in the fall I can store the plant pot and all in an out of the way dry corner, and let the whole plant die off and dry up. When I return to Canada in the spring the chili fruit have turned red and are dry, and ready to be ground up for use. They can also be harvested when they are starting to turn red and strung up on a thread and hung around the kitchen to dry. This way they look good and are right there when you need them.
Once the chilies are dried, the end can be snipped off and the seeds tipped out and stored.
For thick skinned peppers, cut the mature pepper in half, scrape out the seeds and dry them on a paper towel for a few days.
Squash and Cucumbers need to be grown in the garden til they have produced mature seeds inside. For summer squash and cucumbers this means until they are way past the eating stage, and the skin has become thick and hard. Then it is a case of breaking open the fruit and scooping out the seeds and drying them on a paper towel.
Tomatoes can be a bit more tricky or not. The way some say to collect tomato seeds is to scoop the seeds from the ripened tomato, and put this fleshy mix into a jar with a little water in it. Shake this mix a few times a day for 3-5 days until the gelatinous flesh has separated from the seeds, and the mixture is starting to ferment. Pour off the fleshy liquid, and rinse the seeds well and dry them on a plate or paper towel. I used to do this, but now I just scoop the seeds onto a paper towel, flesh and all and by-pass the soaking part. I end up with seeds that are perfectly fine for planting the next year. The seeds tend to stick to the paper towel, but if they are spread thinly enough on the towel, you can tear off the paper towel attached to that seed and plant it towel and all.
 
Once the seeds have been collected and labelled, they can be stored in a cool, dry, dark place ready for the next seasons round of planting.
 

Sunday 25 August 2013

Glorious garlic

This weekend I was at the Haliburton garlic festival.


It is here that the local growers have an opportunity to sell their garlic, and other produce.


How I grow garlic in Canada:
In the fall amend the soil with lots of compost.
Plant the individual cloves about mid October 5-6" apart, pointy end up about 2" deep.
After the first hard frost, apply some mulch to the bed to help stop heaving of the bulbs.
Next spring after the snow has melted, expect the green shoots to emerge.
Keep weeded, and watered. Harvest in the summer, after 2-3 leaves have turned brown. 
 

Friday 23 August 2013

Red is the new yellow

My first red sunflower of the season.


Perennial sunflower reaching for the sky.


Hollyhock

 
Nasturtiums adding a splash of colour. The beneficials love them too. Try them on a salad to brighten it up....yummy

 
Visited my friend Bob's garden. Love the tomato trellis.

 
He has quite the squash crop on the go.

 
And here they are hiding under the leaves.


Tuesday 20 August 2013

Abbey Gardens

Down the road aways there is something magical happening.
A 210 acre gravel pit site, has morphed into a massive garden. They call it Abbey gardens .
It is part of a robust local foods movement, whose aim is to provide local organic produce to restaurants, families and weekly customers.
I went for a wander through the gardens yesterday.

A straw bale building houses the produce for sale.

 
Lots of produce for sale inside


Garlic drying on the veranda.
 
The gardens are an abundance of vegetables and flowers, and there are signs  describing what is happening in the various areas and why.

Bush beans
 
 
Red cabbages in the pickling garden

 
Corn


I found myself lusting after the hoop houses and the raised beds

 
Kale

 
Poppies for a shot of colour

 
Scarlet runner beans are worth growing just for the flowers

 
This sunflower seemed too perfect to be real

 
These chickens are an older breed,that does well in cold climates


Abbey Gardens is a wonderful place to find inspiration, and to learn more about how to provide food for ourselves, while at the same time caring for the environment that we grow it in.

Saturday 17 August 2013

An apple by any other name.

Yesterday there was an apple on the ground. After sampling it we decided that it was ripe, so we picked some more.
I think this tree is ready to go. It seems early to me. I thought I'd have to wait a few more weeks. I don't know which one this is. I did write down the 5 varieties we planted 2 years ago, but that was before we moved, and the book is still packed in a box somewhere. It could be a Cortland. I know one of them was.

 
I'm not sure we have enough that any will last for a pie. They sure taste good straight off the tree.

 
The tree is not very tall and the echinacea have grown right up into it. The tree was growing hard against a building, almost naturally espaliered against the wall with only a little pruning. But the weight of the apples and a few hard rainfalls seem to have given it a list away from the wall. We may have to anchor it back to the wall somehow.
I'm hoping the deer don't find the tree before we've finished harvesting.


Thursday 15 August 2013

Salad Days

I don't like to buy tomatoes, so it is always a mark of summer when we start harvesting them from the garden.We've been eating salads from the garden for a while now, but it is only in the last few weeks we harvested our first tomato, albeit a cherry tomato.
Here we have 3 different lettuces, arugula, basil,tomatoes, sno peas and the flower petals of nasturtium, bee balm and calendula.


There are some of us (not to be named), who say that a cherry tomato isn't a real tomato. A real tomato is one that you can cut thick slices off and make a sandwich with.
Today we harvested our first "real" tomato.

Now that is a real tomato!
 

Tuesday 13 August 2013

Perpetual Parsley and other Herbs

Parsley is always in my garden, and I never have to plant it. Both in New Zealand and in Canada, it self seeds with abandon. Yes it is a biennial. That is, it produces leaves only the first year, then flowers the second year before dying. I find that if I let it go to seed it self seeds quite nicely. If the seedlings are in the wrong place, then in early spring it is easy to transplant them.I must have planted it originally, but now every year I have both last years plants flowering, and the new seedlings establishing themselves. The beneficial insects love the flowers.

 
I also have chives, both the regular chives with the pink flowers, and garlic chives with white flowers. Both can be divided as the clumps get bigger.
Thyme slowly spreads along the border. The bees love it when it is in flower. It also self seeds if it finds the spot to its liking. I've had it self seed abundantly in a gravel pathway.Lovely to walk on.

 
Oregano is more of a thug, spreading quickly where ever it can.


Not as bad as mint, which has been banished from the garden, and is growing where the lawn meets the wilderness. I have regular mint and chocolate mint.
Beebalm (bergamot) spreads its way through the garden, fighting it out with the other thugs. Red is my favourite here.
I usually grow some of my basil plants in a pot. The roots seem to enjoy the extra warmth, and I can keep them well watered and fertilised, which they appreciate.
I grow 2 kinds. Italian Basil which makes great pesto,

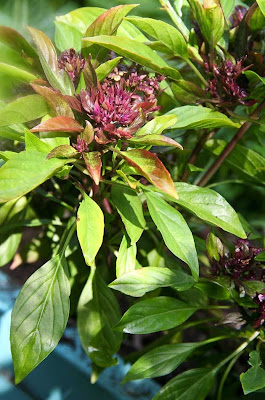
and Thai Basil, which I love for the flowers, and for cooking Thai food.

I keep the Italian basil picked free of flowers,so it will keep producing new leaves. The Thai basil I usually let it go to flower early on because it is so pretty.
Sometimes I'll grow a small leaf Greek basil. It forms perfect mounds of leaves, and looks like it has been trained to rounded globes. Four or five plants in a pot makes a very attractive planting for on the deck. It tastes good too.